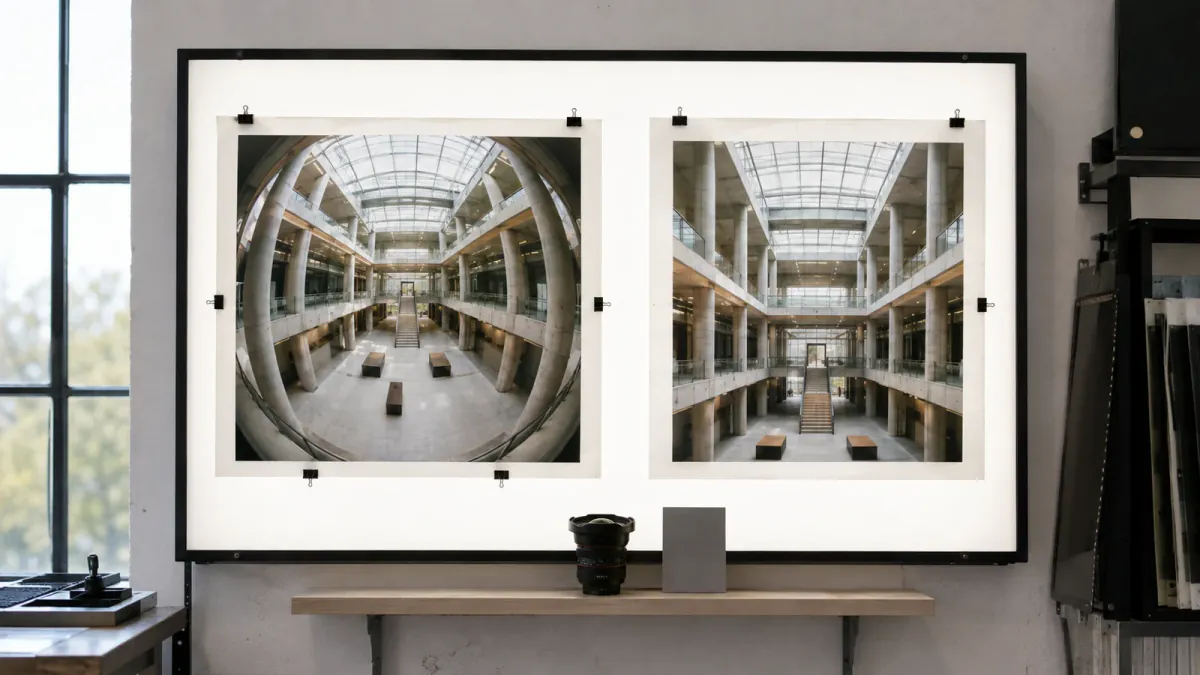
Imagine a room with a bowed doorway near the edge of the photograph and a person beside it. Apply a fisheye correction profile and the doorway straightens. The face may stretch, while the new crop cuts off a hand. The geometry improved. Did the photograph?
Keep the curve in the conversation
That small disagreement is the useful part of fisheye editing. A profile offers a second interpretation of the exposure, bringing curved lines toward a straighter rendering. It also changes the space available to the subject. Keep the original beside the edit so the correction has something meaningful to compete with.
An interior may benefit from orderly geometry. A performance photograph may gain energy from the curve. The distinctive sweep of a fisheye lens can be part of the picture you intended, rather than a mistake waiting for a slider.
The 7Artisans AF 10mm f/2.5 provides a useful example. Its manufacturer supplies a downloadable correction profile. Start with a raw photograph, the matching profile, and Lightroom Classic or Photoshop's Camera Raw. Keep an uncorrected version alongside the working edit.
A matching profile comes first
Use the manufacturer's Calibration/Profiles page and select the AF 10mm F2.5 entry. The page also lists other fisheyes, so check the complete model name before downloading. Extract the archive and retain its instructions with the LCP file.
Fstoppers' September 3 walkthrough describes Adrian Alford importing the file through Lightroom Classic's File > Import Develop Profiles and Presets command. His imported profile also becomes available in Photoshop. Follow the supplied installation instructions for your application and confirm that the profile appears before beginning the comparison.
In Lightroom Classic, open the Develop module's Lens Corrections panel, select Profile, and enable profile corrections. Check the Make, Model, and Profile fields. In Camera Raw, locate the lens-profile controls in the Optics panel and select the matching profile.
Adobe's Lightroom Classic guidance explains that profiles use camera and lens metadata, and that the available choices differ between raw and non-raw files. The raw original is therefore the useful starting point for this exercise. Check any built-in correction message so you know which adjustments are already active.
Follow the same three details
Choose three reference details: one near the center and one toward each side. In the imagined room, use the central vertical, outer door frame and person’s face. Toggle the profile while watching those exact details. A satisfying central line can distract from what happened at the sides.
Optical correction and perspective adjustment solve different problems. The profile addresses the lens's rendering. Upright and Transform controls address the appearance of tilted horizons and converging lines. Adobe recommends applying the lens profile before Upright , so its perspective analysis starts from the corrected geometry.
Work through these decisions in that order, then settle the crop before refining tone and local emphasis. This sequence keeps the changing boundaries visible while you judge the composition. White balance or exposure adjustments can remain provisional until the final framing is established.
Now make the comparison concrete. Keep the uncorrected edit as A. Make B with full profile correction and C with a lower amount. Leave exposure and color identical. If B straightens the doorway but distorts the face, C may offer a better balance even with some curvature remaining.
Faces and brickwork reveal the stretch
View the whole frame first, then examine the center, sides, and corners at 100 percent. Straightening a fisheye redistributes image detail, with substantial stretching possible toward the boundaries. Fine texture and familiar shapes make the effect easier to evaluate.
In an architectural photograph, inspect lettering, brickwork, and window frames. In a portrait or event picture, pay particular attention to faces, hands, and shoulders near the edges. A small change in the correction amount can affect these details more strongly than it affects the central subject.
Compare the same features in the original and corrected versions. Ask whether the straighter geometry improves their relationship to the rest of the scene. Judge edge detail at the intended output size as well, since a large print and a small online image place different demands on the file.
Our 7Artisans autofocus fisheye article explores the shooting side of this decision, including close foregrounds and the placement of moving subjects.
Check what the new rectangle removes
Correction can reveal empty edges and reduce the usable field of view. Temporarily disable automatic cropping where available to see the transformed boundary. Then frame the image around the subject's essential relationships.
Leave room for a gesture, the end of a railing, or the gap separating a person from a doorway. These small areas explain the scene. In our imagined room, check whether the hand survives. A cleaner rectangle is a poor bargain if it removes the detail that makes the person’s gesture readable.
Adobe's Camera Raw documentation describes the Distortion Amount control: 100 applies the profile's full correction, while lower settings reduce its strength. Partial correction gives you an intermediate rendering when the full setting sacrifices too much of the composition.
My Cropping With Intention essay at Kisau Photography considers how the edge of the frame changes the weight of a gesture or visual anchor. Apply the same attention here. The crop should make the photograph's central idea easier to see.
Give all three versions a fair comparison
Compare A, B and C at the same size, using four questions:
- Where does the eye settle first?
- Which important lines benefit from straightening?
- How do faces and objects near the edges change?
- Which version retains the context the subject needs?
Keep the raw file, profile and all three edits. Descriptive names such as curved performance view or corrected interior are more helpful than final-final. Export at the actual delivery size and inspect the boundaries again after resizing and output sharpening. The portrait depth exercise offers another way to judge whether a person still separates clearly from the background.
The version worth keeping may have the straightest doorway. It may instead leave a little curve and give the person back their hand. You can explain that choice by pointing to the photograph, which is a more useful stopping point than reaching the end of a slider.